Hi Today I am sharing with you a layout that I created using ColourArte's Twinkling H2Os with my Sin City Stamps. I created this project for the Design Team Call at ColourArte. A few months ago, I was so excited to receive some ColourArte products during a cross promotion with Sin City Stamps. Since that day you have been seeing lots of projects on my blog using their products!
Here is my finished project. Aren't those flowers amazing?!?!?!
Supplies Needed
ColourArte : Twinkling H2Os - Playful Peony, Deep Coral, Mandarin Citrine, Orange Peel, Meridian Blue, Teal Zircon, Lemongrass, Ginger Peach, Periwinkle, Rain Forest
ColourArte : Radiant Gels - Indian Copper
Sin City Stamps : Fairies & Blossoms, Fairies & Blossoms 2
Ranger Archival Inks- Jet Black
Modge Podge Mold (Nature) and Melts (white)
Glue Gun
Kaiser Craft- Wood Flourish
Recollections: Woven Paper
Pacon- Multi Media paper
Maya Road - Chipboard
Black Cardstock
Photography by Doug Dellinger, DP Photography
I started by activating my Twinkling H2Os by spritzing them with water.
After spritzing my Multi-Media paper with water, I painted my background with the Twinkling H2Os. I just love how this paper turned out!
Once the paper was dry, I stamped lots of blossoms all over my my page with archival ink. I stampede 1 Extra large blossom, 2 large Blossoms, 2 Medium Blossoms, 2 small Blossoms, and 2 mini blossoms. I then fussy cut out all those blossoms.
I found some broken wooden flourishes in my drawer. (They were probably broken because I have too much goodies in the drawer.) I painted the flourishes with Rain Forest Twinkling H2Os.
While the flourishes were drying I added some Modge Podge Melts into the Nature mold.
While the molds were cooling, I matted my photo on black cardstock and started laying out my design on my background paper. I originally started with a white cardsotck but changed my mind and decided on the woven paper.
While I was laying out the design I decided the background needed a little more color. So I dipped the end of my paint brush into the Twinkling H2Os.
You can see how adding that little bit of color added so much to the layout!
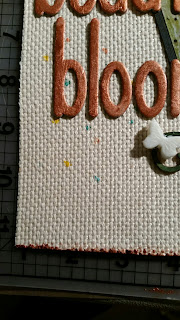
To create the title I took some "naked" chipboard and painted it with the Indian Copper Radiant Gels.
I have to admit I really love this color!
I then glued everything in place with a liquid adhesive as I was worried my ATG wouldn't adhere well to the woven paper. Once I was done I thought my paper needed something more. See how plain it looks?
So I took out my Indian Copper Radiant Gels again and painted the edges of my paper. You can see below the difference it made once I painted one edge.
And here is the finished project once again.
Here is my finished project. Aren't those flowers amazing?!?!?!
Supplies Needed
ColourArte : Twinkling H2Os - Playful Peony, Deep Coral, Mandarin Citrine, Orange Peel, Meridian Blue, Teal Zircon, Lemongrass, Ginger Peach, Periwinkle, Rain Forest
ColourArte : Radiant Gels - Indian Copper
Sin City Stamps : Fairies & Blossoms, Fairies & Blossoms 2
Ranger Archival Inks- Jet Black
Modge Podge Mold (Nature) and Melts (white)
Glue Gun
Kaiser Craft- Wood Flourish
Recollections: Woven Paper
Pacon- Multi Media paper
Maya Road - Chipboard
Black Cardstock
Photography by Doug Dellinger, DP Photography
I started by activating my Twinkling H2Os by spritzing them with water.
After spritzing my Multi-Media paper with water, I painted my background with the Twinkling H2Os. I just love how this paper turned out!
Once the paper was dry, I stamped lots of blossoms all over my my page with archival ink. I stampede 1 Extra large blossom, 2 large Blossoms, 2 Medium Blossoms, 2 small Blossoms, and 2 mini blossoms. I then fussy cut out all those blossoms.
I found some broken wooden flourishes in my drawer. (They were probably broken because I have too much goodies in the drawer.) I painted the flourishes with Rain Forest Twinkling H2Os.
While the flourishes were drying I added some Modge Podge Melts into the Nature mold.
While the molds were cooling, I matted my photo on black cardstock and started laying out my design on my background paper. I originally started with a white cardsotck but changed my mind and decided on the woven paper.
To create the title I took some "naked" chipboard and painted it with the Indian Copper Radiant Gels.
I have to admit I really love this color!
I then glued everything in place with a liquid adhesive as I was worried my ATG wouldn't adhere well to the woven paper. Once I was done I thought my paper needed something more. See how plain it looks?
And here is the finished project once again.


Comments